Quantcast
Channel: Encryption – Didier Stevens
Viewing all 78 articles
Browse latest View live

Cracking VBA Project Passwords

$
0
0

VBA projects can be protected with a password. The password is not used to encrypt the content of the VBA project, it is just used as protection by the VBA IDE: when the password is set, you will be prompted for the password.

Tools like oledump.py are not hindered by a VBA password, they can extract VBA code without problem, as it is not encrypted.

The VBA password is stored as the DPB value of the PROJECT stream:

You can remove password protection by replacing the values of ID, CMG, DPB and GC with the values of an unprotected VBA Project.

Thus a VBA password is no hindrance for staticanalysis.

However, we might still want to recover the password, just for the fun of it. How do we proceed?

The password itself is not stored inside the PROJECT stream. In stead, a hash is stored: the SHA1 hash of the password (MBCS representation) + 4 byte salt.

Then, this hash is encrypted (data encryption as described in MS-OVBA 2.4.3.2) and the hexadecimal representation of this encrypted hash is the value of DPB.

This data encryption is done according to an algorithm that does not use a secret key. I wrote an oledump.py plugin (plugin_vbaproject.py) to decrypt the hash and display it in a format suitable for John the Ripper and Hashcat:

The SHA1 of a password + salt is a dynamic format in John the Ripper: dynamic_24.

For Hashcat, it is mode 110 and you also need to use option –hex-salt.

Remark that the password passed as argument to the SHA1 function is represented in Multi Byte Character Set format. This means that ASCII characters are represented as bytes, but that non-ASCII characters might be represented with more than one byte, depending on the VBA project’s code page.


Decrypting With translate.py

$
0
0

You’ve probably encountered malicious PowerShell scripts with an encrypted payload (shellcode, PowerShellScript, …).

Here is an example that I created:

Update: this example is on pastebin: https://pastebin.com/QUGiWTHj

There are 2 BASE64 strings in this script. The first one (cfr. variable $cfii) is the encryption key. The second one (cfr. variable $hctqdvb) is the payload.

The script uses AES encryption, with a 256-bit key, CBC mode, PKCS7 padding and an initialization vector (IV) that is stored in the first 16 bytes of the payload (0..15).

And after the payload is decrypted, it has to be decompressed with the Gzip algorithm.

With base64dump.py, I can find the 2 BASE64 strings in the PowerShell script:

I select the second BASE64 string (payload) to pipe into translate.py, using the following small Python script (decrypt.py) to do the decryption:

from Crypto.Cipher import AES
from Crypto.Util import Padding

def Decrypt(data):
    iv = data[0:16]
    ciphertext = data[16:]
    key = binascii.a2b_base64(keybase64)
    oAES = AES.new(key, AES.MODE_CBC, iv)

return Padding.unpad(oAES.decrypt(ciphertext), 16)

This small script uses crypto functions from pycryptodome.

I use translate.py in fullread mode (-f –fullread, to “translate” the file in a single step, in stead of byte per byte) and use function Decrypt to decrypt the block of data, like this:

I load the script decrypt.py with option -s, and I pass the key as a BASE64 string via option -e.

The output is non-printable bytes, because the decrypted payload is Gzip compressed. I use translate.py again to do the decompression:

And now the “payload” I used is decrypted and decompressed: “This is a test!”


Decrypting TLS Streams With Wireshark: Part 1

$
0
0

In this first example, I show how to decrypt a TLS stream with Wireshark.

I made my example as such, that the encryption in this example is done with keys derived from a master secret. This master secret is derived from a pre-master secret, which is securely exchanged between the client and server using RSA crypto.

Remark that this method will not work with modern browsers and web servers, as they use perfect forward secrecy. This will be explained in part 2.

I use my TCP honeypot to set up a web server, and curl to request a page over TLS. I use curl for Windows build with OpenSSL, and not the curl version distributed with Windows 10, that relies on schannel.

I use the following curl command with options to force a TLS encryption method that is based on a pre-master secret that is encrypted with the public RSA key of the server:

curl.exe –verbose –insecure –tls-max 1.2 –ciphers AES256-SHA –dump-header 01.headers –output 01.data –trace 01.trace –trace-time https://192.168.190.130

To force a cipher suite that is based on RSA for the exchange of the pre-master secret, I use options –tls-max 1.2 and –ciphers AES256-SHA.

Option –insecure is necessary because I’m using a self-signed certificate.

I choose the other options to produce as much information as possible: downloaded content (01.data), headers (01.headers) and a trace file (01.trace).

Here is a screenshot of the packet capture for this HTTPS traffic:

Following the TCP stream shows that the data is encrypted (except for some parts during the handshake, like the certificate):

If we inspect that handshake, more precisely, looking at the Server Hello packet, we see that a cipher suite was selected that relies on RSA and AES:

Data encrypted with this cipher suite can be decrypted by Wireshark when we provide the private RSA key of the server. That’s because in this example, Wireshark needs to decrypt the pre-master secret sent by the client to the server. This pre-master secret is encrypted with the public RSA key of the server.

These are the steps to follow:

Go to preferences:

Search for the TLS protocol, and edit the RSA Keys list.

Click the + button to add a key:

Then add the RSA private key key-20180317-161753.pem.

When you then close the dialogs, and the main screen regains focus, the TLS data will be decrypted:

Remark that for packets 9 and 10, the Protocol column value changed from TLSv1.2 to HTTP, and the Info column from Application Data to HTTP methods and replies.

And in the bottom view (hexadecimal & ASCII dump), a “Decrypted TLS” tab was added:

We will now try the 3 available Follow Streams commands:

When we select TCP, we still have encrypted data:

But when we select Follow TLS stream, we can now see the decrypted data:

And with Follow HTTP, we also have decrypted data:

But remark that there is some data duplication, this is possibly a bug in Wireshark. To be investigated.

In part 2, we will look at the same request, but without using the server’s RSA private key, and also at an example with perfect forward secrecy.

The capture file, private key, and other data used in this blog post can be downloaded here:

tls-decryption-part-1.zip (https)
MD5: 905A5D3F2D0AEAA98BD3751AD5CAD9E2
SHA256: 03175A0C6EC5B451769AA7627BFA0487FFFB2485D455D467CCCA9CCD1075ACA9

Decrypting TLS Streams With Wireshark: Part 2

$
0
0

In blog post “Decrypting TLS Streams With Wireshark: Part 1“, I explain how to decrypt TLS streams with a specific type of encryption (pre-master secret exchanged via RSA) using the web server’s private key.

In this blog post, we will use the client to get the necessary information to decrypt TLS streams.

We do this by setting environment variable SSLKEYLOGFILE and subsequently launching our client (Chrome, Firefox, curl, …, but not Internet Explorer).

When this environment variable is set, a compatible TLS client will write data in the text file pointed to by SSLKEYLOGFILE. This data can be used to decrypt the TLS stream.

In a first test, I set SSLKEYLOGFILE=secrets-1.txt and issue exactly the same curl command as in part 1:

curl.exe –verbose –insecure –tls-max 1.2 –ciphers AES256-SHA –dump-header 01.headers –output 01.data –trace 01.trace –trace-time https://192.168.190.130

To force a cipher suite that is based on RSA for the exchange of the pre-master secret, I use options –tls-max 1.2 and –ciphers AES256-SHA.

Here is the content of secrets-1.txt:

RSA b73e7985e324abc0 030330f29c3ac42f28d91c967ad9c4b484f625ac95f6ad1dfe4474eecb6395f8a6b607f80594ebe97b45f24cae774800
CLIENT_RANDOM 53a7bcdb320d3cc85dbb21956403da8801617a2980fb79f7b50fd6d1189d0472 cce8feba2219194646201279f1bbc551035ce3d1f8a34d3514df8297078fa80f0e5b19e5aa965adf285e93e41c93c210

This file can be used in Wireshark to decrypt the TLS stream. Just like in part 1, we go to preferences for the TLS protocol:

I already removed the RSA private key that was set in part 1 (so that it will not influence my part 2 tests):

And then I set the “(Pre)-Master-Secret log filename” to secrets-1.txt, the file that was written by curl because environment variable SSLKEYLOGFILE is set to secrets-1.txt.

When this is done, the TLS data is decrypted, as can be witnessed by the appearance of (green) HTTP protocol packets:

Wireshark is able to decrypt this TLS stream because of the secrets in file secrets-1.txt. There are 2 secrets in file secrets-1.txt, and each one, by itself, contains enough information for Wireshark to do the decryption.


The first secret in secrets-1.txt is: RSA b73e7985e324abc0 030330f29c3ac42f28d91c967ad9c4b484f625ac95f6ad1dfe4474eecb6395f8a6b607f80594ebe97b45f24cae774800
This is the pre-master secret.

b73e7985e324abc0 is the start (first 8 bytes) of the encrypted pre-master secret:

And 030330f29c3ac42f28d91c967ad9c4b484f625ac95f6ad1dfe4474eecb6395f8a6b607f80594ebe97b45f24cae774800 is the unencrypted pre-master secret.

Wireshark can use this pre-master secret, together with cleartext data found inside the TLS stream (client and server random), to calculate the master secret and session keys.

This RSA entry in itself is enough for Wireshark to decrypt this TLS stream (if we only keep the RSA entry in secrets-1.txt, Wireshark can still decrypt).


The second secret in secrets-1.txt is: CLIENT_RANDOM 53a7bcdb320d3cc85dbb21956403da8801617a2980fb79f7b50fd6d1189d0472 cce8feba2219194646201279f1bbc551035ce3d1f8a34d3514df8297078fa80f0e5b19e5aa965adf285e93e41c93c210

This is the master secret.

53a7bcdb320d3cc85dbb21956403da8801617a2980fb79f7b50fd6d1189d0472 is the client random:

And cce8feba2219194646201279f1bbc551035ce3d1f8a34d3514df8297078fa80f0e5b19e5aa965adf285e93e41c93c210 is the unencrypted master secret.

Wireshark can use this master secret to calculate the session keys.

This CLIENT_RANDOM entry in itself is enough for Wireshark to decrypt this TLS stream (if we only keep the CLIENT_RANDOM entry in secrets-1.txt, Wireshark can still decrypt).


SSLKEYLOGFILE can also be used to capture the secrets necessary to decrypt TLS streams encrypted with perfect forward secrecy (e.g. not relying on the server’s private key).

In a second test, I set SSLKEYLOGFILE=secrets-2.txt and issue this curl command:

curl.exe –verbose –insecure –dump-header 01.headers –output 01.data –trace 01.trace –trace-time https://192.168.190.130

In this test, curl uses TLS 1.3 with perfect forward secrecy:

x25519 is Diffie-Helman based on elliptic curve Curve25519: we have perfect forward secrecy here that uses ephemeral Diffie-Hellman key exchange. Hence the private key of the server can not help us decrypt this TLS stream. We need the secrets saved in SSLKEYLOGFILE secrets-2.txt:

SERVER_HANDSHAKE_TRAFFIC_SECRET 3928c6ded8c2e9c251dc4c57f2a81935a3f0e5a61f3d40b25fd87d5f05db3e47 b8c81cee570a35f077664f16780017d7037adb1efacc448d05de9c806868290c32f587a1c29e577abcc7e5d1609f070b
EXPORTER_SECRET 3928c6ded8c2e9c251dc4c57f2a81935a3f0e5a61f3d40b25fd87d5f05db3e47 bc8a82770f43dc9b326cd8565b93ebfd3c6f9d9be53693510685b265980d98be7f8a7de613895b76454ec19d06e12825
SERVER_TRAFFIC_SECRET_0 3928c6ded8c2e9c251dc4c57f2a81935a3f0e5a61f3d40b25fd87d5f05db3e47 7e40bb08f33bfc281878450c08e21e1d2e92ca1214436aa8353925fee2fe39d69175710e90bd6c76940af5596862525e
CLIENT_HANDSHAKE_TRAFFIC_SECRET 3928c6ded8c2e9c251dc4c57f2a81935a3f0e5a61f3d40b25fd87d5f05db3e47 7aec5af0565c8fa05431534daf6a98da645ccf9eb791626008ebe5d9053e2e5046986e577e09b5a9f3355d4aff685111
CLIENT_TRAFFIC_SECRET_0 3928c6ded8c2e9c251dc4c57f2a81935a3f0e5a61f3d40b25fd87d5f05db3e47 7a31364a743eee1ba3ed10fc082099c1fb09ad9175fd5ec81101521a3f34e3f3ab6e83f0bd77529ce9ff3eb9f4beedad

And when I use this secrets-2.txt file with Wireshark, the TLS stream is decrypted:

If I comment-out all SSLKEYLOGFILE secrets-2.txt entries except the client secret entries, Wireshark can only decrypt data coming from the client (# is a line-comment):

And vice versa when I comment-out everything except the server secret entries:

Value 3928c6ded8c2e9c251dc4c57f2a81935a3f0e5a61f3d40b25fd87d5f05db3e47 found in each secrets-2.txt entry is the client random:

Remark that in these 2 tests, I set SSLKEYLOGFILE=secrets.txt. This makes that curl will create a file secrets.txt in its working directory. You can also use an absolute path, for example:

set SSLKEYLOGFILE=c:\demo\secrets.txt


In part 3, I’ll give some practical tips.


The capture file, secrets, and other data used in this blog post can be downloaded here:

tls-decryption-part-2.zip (https)
MD5: 562F169A57557737D3E4B1F9CDF3B252
SHA256: 8DD27510B2F6CD58A55F42515EF756572658D2ADFE7CEA6151DD45EE5F7DB171

Decrypting TLS Streams With Wireshark: Part 3

$
0
0

Say that you have to share a decrypted TLS stream, like the stream we decrypted in part 1.

You did a forensic investigation, and you need to included the decrypted TLS stream in your findings. Or you are troubleshooting an issue, and need need to share the decrypted TLS stream with a vendor.

I’m sure you don’t want to share the web server’s private key with a vendor (remember, in part 1, we used a web server’s private key to decrypt a TLS stream, while in part 2 we used a client’s SSLKEYLOGFILE).

If you would have the necessary secrets in a SSLKEYLOGFILE, you would be able to share that. Because those keys only apply to that particular TLS stream, they are useless for other TLS streams.

Such a file with secrets can be generated by Wireshark, when you have the capture file open together with the server’s private key file.

I use option “Export TLS Session Keys”:

The content of the file that was created (tls.keys) looks very similar to the SSLKEYLOGFILE we generated in part 2:

A small difference here, is that the RSA secret includes the master key in stead of the pre-master key.

This file can now be shared (together with the capture file) with third parties, without revealing the web server’s private key. They can then use it like explained in part 2.


To make life easier for the recipients of your capture file with secrets file, you can also merge both files together: embedding the secrets into the pcapng file. This way, they don’t have to configure secrets files in Wireshark, just opening the pcapng file is sufficient for the TLS traffic to be decrypted.

This embedding can be done with editcap’s –embed–secrets option:

The type of secret we want to inject is TLS. The tls.keys file (or the SSLKEYLOGFILE files from part 2) is injected like this into pcapng file capture-1.pcapng:

“c:\Program Files\Wireshark\editcap.exe” –inject-secrets tls,export.keys capture-1.pcapng capture-1-with-keys.pcapng

The resulting file, capture-1-with-keys.pcapng can then be opened in any instance of Wireshark, and the TLS traffic will be decrypted automatically, without having to change the configuration for the TLS protocol:

Embedding secrets is only possible with the pcapng format, because that format has a record type specific for secrets:

This is not possible with the older pcap format.

You can also created a pcap file with only the traffic you want to share, and nothing more. Use a display filter to select the traffic you want to share, and then export the specified packets:

And then you can open this filtered capture file, and generate TLS keys only for the traffic you want to share.


A typical Wireshark installation comes with a command-line version too: tshark. tshark uses the same settings as Wireshark. Thus if you defined a secrets file to decrypt TLS in Wireshark, tshark will also be able to do the decryption (-Y http is a display filter for http):

While if nothing is configured to do the decryption in Wireshark, tshark won’t be able to decrypt:

A final tip I want to share: starting with Python 3.8, python supports SSLKEYLOGFILE too (it uses a version of openssl that supports this).


Previous blog posts:

Decrypting TLS Streams With Wireshark: Part 1

Decrypting TLS Streams With Wireshark: Part 2

Update: XORSelection.1sc Version 6.0

$
0
0

I released an update to my 010 Editor script XORSelection.1sc.

010 is a binary editor with a scripting engine. XORSelection.1sc is a script I wrote years ago, that will XOR-encode a (partial) file open in the editor.

The first version just accepted a printable, arbitrary-length string as XOR-key. Later versions accepted an hexadecimal key too, and introduced various options.

With version 6.0, I add support for a dynamic XOR-key. That is a key that changes while it is being used. It can change, one byte at-a-time, before or after each XOR operation at byte-level is executed.

Hence option cb means change before, and ca means change after. Watch this video to understand exactly how the key changes (if you want to skip the part explaining my script XORSelection, you can jump directly to the dynamic XOR-key explanation).


I made this update to my XORSelection script, because I had to “manually” decode a Cobalt Strike beacon that was XOR-encoded with a changing XOR key (it is part of a WebLogic server attack). Later I included this decoding in my Cobalt Strike beacon analysis tool 1768.py.

The decoding shellcode is in the first 62 bytes (0x3E) of the file:

After the shellcode comes the XOR-key, the size and the beacon:

We can decode the beacon size, that is XOR-encoded with key 0x3F0882FB, as follows. First we select the bytes to be decoded:

Then we launch 010 Editor script XORSelection.1sc:

Provide the XOR key (prefix 0x is to indicate that the key is provide as hexadecimal byte values):

And then, after pressing OK, the bytes that contain the beacon size are decoded by XOR-ing them with the provided key:

This beacon size (bytes 00 14 04 00) is a little-endian, 32-bit integer: 0x041400.

To decode the beacon, we select the encoded beacon and launch script XORSelection.1sc again:

This time, we need to provide an option to change the XOR-decoding process. We press OK without entering a value, this will make the next prompt appear, where we can provide options:

The option we need to use to decode this Cobalt Strike beacon, is cb: change before.

In the next prompt, we can provide the XOR-key:

And we end up with the decoded beacon (you can see parts of the PE file that is the beacon):

Remark that you can enter “h” at the option prompt, to get a help screen:

I made this video explaining how to use this new option, and also explaining how the XOR key is changed exactly when using option change before (cb) or change after (ca).

If you want to skip the part explaining my script XORSelection, you can jump directly to the dynamic XOR-key explanation.

XORSelection_V6_0.zip (https)
MD5: C1872C275B59E236906D38B2302F3F4B
SHA256: 1970A506299878FAC2DDD193F9CE230FD717854AC1C85554610DDD95E04DE9E9


FileZilla Uses PuTTY’s Registry Fingerprint Cache

$
0
0

Today I figured out that FileZilla uses PuTTY‘s registry key (HKCU\SOFTWARE\SimonTatham\PuTTY\SshHostKeys) to cache SSH fingerprints.

This morning, I connected to my server over SFTP with FileZilla, and got this prompt:

That’s unusual. I logged in over SSH, and my SSH client did not show a warning. I checked the fingerprint on my server, and it matched the one presented by FileZilla.

What’s going on here? I started to search through FileZilla configuration files (XML files) looking for the cached fingerprints, and found nothing. Then I went to the registry, but there’s no FileZilla entry under my HKCU Software key.

Then I’m taking a look with ProcMon to figure out where FileZilla caches its fingerprints. After some searching, I found the answer:

FileZilla uses PuTTY’s registry keys!

And indeed, when I start FileZilla again and allow it to cache the key, it appears in PuTTY’s registry keys.

One last check: I modified the registry entry and started FileZilla again:

And now FileZilla warns me that the key is different. That confirms that FileZilla reads and writes PuTTY’s registry fingerprint cache.

So that answered my question: “Why did FileZilla warn me this morning?” “Because the key was not cached”.

But then I was left with another question: “Why is the key no longer cached, because it was cached?”

Well, I started to remember that some days ago today, I had been experimenting with PuTTY’s registry keys. I most likely deleted that key (PuTTY is not my default SSH client). I verified the last-write timestamp for PuTTY’s registry key, and indeed, 4 days ago it was last written to.

Update:

Thanks to Nicolas for pointing out that fzsftp is based on PuTTY:

Quickpost: Decrypting Cobalt Strike Traffic

$
0
0

I have been looking at several samples of Cobalt Strike beacons used in malware attacks. Although work is still ongoing, I already want to share my findings.

Cobalt Strike beacons communicating over HTTP encrypt their data with AES (unless a trial version is used). I found code to decrypt/encrypt such data in the PyBeacon and Geacon Github repositories.

This code works if you know the AES key: which is not a problem in the use cases of the code above, as it is developed to simulate a beacon. Beacons generate their own AES key, and thus these beacon simulations also generate their own AES key.

But what if you’re analyzing real beacons used in malware attacks? How do you obtain the AES key?

I found a way to extract the keys (AES and HMAC) from process memory of a running beacon.

I use the following procdump command to prepare process memory dumps:

procdump -mp -w -s 1 -n 5 malware.exe

Then I start the beacon malware.exe in a malware analysis virtual machine while capturing traffic with Wireshark.

My new tool cs-extract-key.py looks in the dumped process memory for the unencrypted (RSA encryption) metadata that a beacon sends to the C2. This metadata contains the AES en HMAC keys.

Example:

This method does not always work: the metadata is overwritten after some time, so the process dump needs to be taken quickly after the beacon is started. And there are also cases were this metadata can not be found (I suspect this is version bound).

For those cases, my tool has another way of obtaining the keys. I extract the encrypted data of the first post of the beacon to the C2 (this is called a callback in the PyBeacon code):

And then I provide this to my tool, together with the process dump. My tool will then proceed with a dictionary attack: extract all possible AES and HMAC keys from the process dump, and try do authenticate and decrypt the callback. If this works, the keys have been found:

And once I have obtained the keys, I can pass them to my traffic decoding program that I have updated to include decryption (and that I have renamed to cs-parse-http-traffic.py):


Quickpost info


How-to: Make Your Own Cert With OpenSSL on Windows (Reloaded)

$
0
0

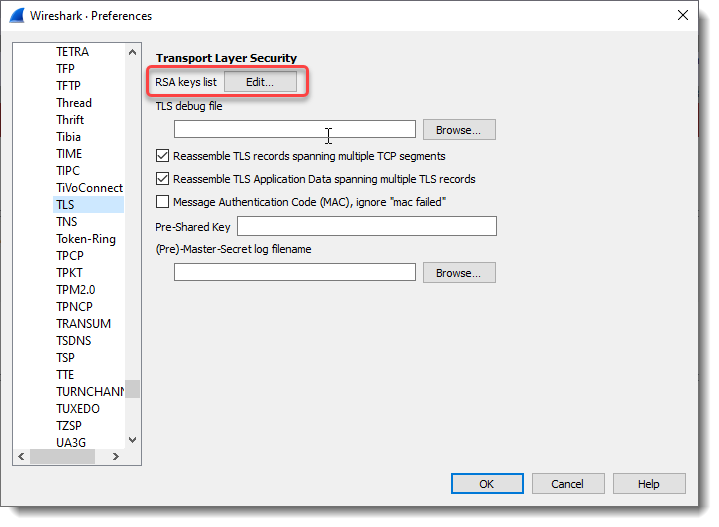
As several things have changed since I published “Howto: Make Your Own Cert With OpenSSL on Windows” 5 years ago, I’m publishing an updated how-to.

This time, I’m using the OpenSSL Windows binaries provided by the Curl developers:

I’m using OpenSSL version 1.1.1i. I chose the 32-bit version, so that you can still follow along in case you have to do this on a 32-bit computer.

This OpenSSL version from the Curl developers is packaged inside a ZIP file: it requires no installation with administrative rights. Just unzip the downloaded file.

Then open a command-line (I’m using cmd.exe) and go to the unzipped folder:

I issue the command “openssl version”, to check that I can run OpenSSL.

Now you are ready to follow along.

And just like in my previous how-to(s), I’m creating 2 certificates (not just one self-signed certificate): one root certificate and one subordinate certificate.

First we generate a 4096-bit long RSA key for our root CA and store it in file ca.key:

openssl genrsa -out ca.key 4096

This generates a private key that is not password protected. It is stored inside file ca.key as printable text (PEM format):

If you want to password-protect this private key, add command option -aes256 to encrypt the private key with AES using a key derived from a password you will be prompted for.

Next, we create our self-signed root CA certificate ca.crt; you’ll need to provide an identity for your root CA:

openssl req -new -x509 -days 1826 -key ca.key -out ca.crt -config openssl.cnf

The -x509 command option is used for a self-signed certificate. 1826 days gives us a cert valid for 5 years.

On Windows, you can double-click the root certificate we just created (ca.crt), and inspect it:

Next step: create our subordinate CA that will be used for the actual signing. First, generate the key:

openssl genrsa -out ia.key 4096

Then, request a certificate for this subordinate CA:

openssl req -new -key ia.key -out ia.csr -config openssl.cnf

Make sure that the Common Name you enter here is different from the Common Name you entered previously for the root CA. If they are the same, you will get an error later on when creating the pkcs12 file.

Next step: process the request for the subordinate CA certificate and get it signed by the root CA.

Here the command requires an extra option, that I did not use in previous how-tos. We need a small text file (altname.cnf), with the following content:

subjectAltName=DNS:www.didierstevens.com

I use the same value as I used for the Common Name (CN): http://www.didierstevens.com.

This subjectAltName is necessary, since Google Chrome version 58 and later no longer use the CN when there is no subjectAltName.

After creating this altname.cnf file, we can issue this command to create the subordinate CA signed by the root CA:

openssl x509 -req -days 730 -in ia.csr -CA ca.crt -CAkey ca.key -set_serial 01 -out ia.crt -extfile altname.cnf

The certificate (ia.crt) will be valid for 2 years (730 days) and I decided to choose my own serial number 01 for this cert (-set_serial 01). For the root CA, I let OpenSSL generate a random serial number.

You can also inspect this certificate (ia.crt) with Windows:

That’s all there is to it! Of course, there are many options I didn’t use. Consult the OpenSSL documentation for more info. For example, I didn’t restrict my subordinate CA key usage to digital signatures. It can be used for anything, even making another subordinate CA. When you buy a code signing certificate, the CA company will limit its use to code signing. And I did not use passwords to protect my keys. In a production environment, you want to protect your keys with passwords.

To use this subordinate CA key for Authenticode signatures with Microsoft’s signtool, you’ll have to package the keys and certs in a PKCS12 file:

openssl pkcs12 -export -out ia.p12 -inkey ia.key -in ia.crt -chain -CAfile ca.crt

Then it can be used to sign a Windows PE file:

signtool sign /f ia.p12 /fd sha256 /td sha256 /tr http://timestamp.globalsign.com/?signature=sha2 Dialog42.exe

Some Observations

Configuration file

Some OpenSSL commands (like the req command we used) require the openssl.cnf configuration file. That is why on Windows, we use command option: -config openssl.cnf

If we do not use this command option on Windows, we get an error:

Can't open C:/Windows/System32/OpenSSL/ssl/openssl.cnf for reading, No such file or directory
22256:error:02001003:system library:fopen:No such process::0:fopen('C:/Windows/System32/OpenSSL/ssl/openssl.cnf','r')
22256:error:2006D080:BIO routines:BIO_new_file:no such file::0:

Even if we run openssl.exe in the same folder as openssl.cnf.

Another option is to set environment variable OPENSSL_CONF to point to the configuration file:

set OPENSSL_CONF= c:\Demo\openssl-1.1.1i_2-win32-mingw\openssl.cnf

Then we can issue commands without referencing the openssl.cnf explicitly:

Command option subj

When we use command req like we did, we are prompted for extra information. This extra information can be passed via the command line too, with command option -subj:

openssl req -new -x509 -days 1826 -key ca.key -out ca.crt -subj “/C=BE/ST=/L=Brussels/O=Didier Stevens/OU=/CN=didierstevens.com/emailAddress=ca@didierstevens.com” -config openssl.cnf

Do not use interactive mode

Interactive mode in OpenSSL, is when you launch opensll.exe, and then issue commands at the OpenSSL prompt, like this:

The error message:

problem creating object tsa_policy1=1.2.3.4.1
25156:error:08064066:object identifier routines:OBJ_create:oid exists::0:
error in req

is a known issue with OpenSSL.

Interactive mode doesn’t “clean up” correctly between commands: it is best not to use interactive mode.

Certificates with a validity period longer than one year

I know that Chrome is no longer accepting certificates with a validity period longer than one year, so I expected my 2-year certificate to be rejected by Chrome (using Chrome 87 on Windows). It was not.

It turns out that this requirement does not apply to certificates like the one I created:

Beginning with Chrome 85, TLS server certificates issued on or after 2020-09-01 00:00:00 UTC will be required to have a validity period of 398 days or less. This will only apply to TLS server certificates from CAs that are trusted in a default installation of Google Chrome, commonly known as “publicly trusted CAs”, and will not apply to locally-operated CAs that have been manually configured.

X.509 Version 1 and Version 3

In my previous blog posts on OpenSSL, the created root certificates (ca.crt) are X.509 Version 3 certificates, and the created subordinate certificates (ia.crt) are X.509 Version 1 certificates. That’s because I did not use any version 3 extensions for the subordinate certificates, and thus OpenSSL creates version 1 certificates.

This changes with the use of the Subject Alternative Name (SAN) extension (subjectAltName) in this how-to. subjectAltName is a version 3 extension, and thus the subordinate certificate (ia.crt) created in this how-to is a version 3 X.509 certificate. In this how-to, I had only one Common Name and therefore I used just one SAN: DNS:www.didierstevens.com.

It is possible to use several SANs, and not only DNS, but also IP for example:

subjectAltName=DNS:www.didierstevens.com,DNS:*.didierstevens.be,IP:127.0.0.1

There are also version 3 extensions that dictate what a certificate can be used for. When these extensions are not present, a certificate can be used for everything.

If you want to limit the use of a certificate to web servers, you can use the following values:

basicConstraints = CA:FALSE
keyUsage = nonRepudiation, digitalSignature, keyEncipherment
extendedKeyUsage=serverAuth
subjectAltName=DNS:www.didierstevens.com

This one can not be used for code signing:

SignTool Error: No certificates were found that met all the given criteria.

And you can use the following values to limit the use of a certificate to code signing:

basicConstraints = CA:FALSE
keyUsage = digitalSignature
extendedKeyUsage=codeSigning

Caveat: I just did some basic tests with these extensions. For example, the cert restricted to code signing can be used by signtool, and Chrome will refuse it when I use it with my simple web server. I didn’t do exhaustive testing to see if code signing is the only thing this cert can be used for.

I did compare it with a commercial code signing certificate I acquired years ago, and there was a difference for the keyUsage: it was marked as critical.

basicConstraints = CA:FALSE
keyUsage = critical,digitalSignature
extendedKeyUsage=codeSigning

Installing the root certificate

When you use the subordinate certificate, you will see that it is still rejected by web browsers, and that the Authenticode signature is not valid.

That is because the subordinate’s root certificate is not trusted. If you install it as a trusted root certification authority, the subordinate certificate will be trusted.

Linux

You can use the same commands on a Linux machine where the OpenSSL package is installed.

Don’t use command option -config though: openssl will find its config file.

And I got an issue with the command option -subj and “empty strings”:

problems making Certificate Request
140254820331968:error:0D07A098:asn1 encoding routines:ASN1_mbstring_ncopy:string too short:../crypto/asn1/a_mbstr.c:100:minsize=1

I had to remove ST= and OU=.

“Public” Private Cobalt Strike Keys

$
0
0

I found 6 private keys used by malicious Cobalt Strike servers. There’s a significant number of malicious CS servers on the Internet that reuse these keys, thus allowing us to decrypt their C2 traffic. For the details, I recommend reading the following blog post I wrote “Cobalt Strike: Using Known Private Keys To Decrypt Traffic – Part 1“.

I integrated these keys in the database (1768.json) of my tool 1768.py (starting version 0.0.8).

Whenever you analyze a beacon with 1768.py that uses a public key with a known private key, the report will point this out:

And when you use option verbose, the private key will be included:

If you want to integrated these 6 keys in your own tools: be my guest. You can find these key pairs in 1768.json.

New Tool: cs-decrypt-metadata.py

$
0
0

cs-decrypt-metadata.py is a new tool, developed to decrypt the metadata of a Cobalt Strike beacon.

An active beacon regularly checks in with its team server, transmitting medata (like the AES key, the username & machine name, …) that is encrypted with the team server’s private key.

This tool can decrypt this data, provided:

  1. you give it the file containing the private (and public) key, .cobaltstrike.beacon_keys (option -f)
  2. you give it the private key in hexadecimal format (option -p)
  3. the private key is one of the 6 keys in its repository (default behavior)

I will publish blog posts explaining how to use this tool.

Here is a quick example:

cs-decrypt-metadata_V0_0_1.zip (https)
MD5: 31F94659163A6E044A011B0D82623413
SHA256: 50ED1820DC63009B579D7D894D4DD3C5F181CFC000CA83B2134100EE92EEDD9F

New Tool: cs-extract-key.py

$
0
0

cs-extract-key.py is a tool designed to extract cryptographic keys from Cobalt Strike beacon process memory dumps.

This tool was already available in my beta repository.

This tool can extract cryptographic keys from process memory dumps of a version 3.x beacon directly:

And from version 4.x together with encrypted data extracted from network capture:

More details can be found in the man page, and in and upcoming blog post.

cs-extract-key_V0_0_1.zip (https)
MD5: 4102A5A5BFD4D432DA4A721D43F568F5
SHA256: BBEDF6CBFFF51669187694F463C32A49F53420BEDF8B76508D06850643DE334F

Update: cs-decrypt-metadata.py Version 0.0.2

$
0
0

This new version of my tool to decrypt Cobalt Strike metadata, now supports transformations.

By default, encrypted metadata in Cobalt Strike traffic is encoded with BASE64 and then transmitted via the Cookie header in HTTP(S) requests.

This metadata is encrypted with a public RSA key, and can be decrypted if the private key is known.

Here is an example of a malicious beacon with a specific metadata encoding.

Analyzing the beacon with my tool 1768.py yields the following information:

First: a public key (field 0x0007) is used, for which we know the private key: thus we will be able to decrypt the metadata.

Second: the encrypted metadata has a specific encoding (field 0x000c). This beacon was configured with a profile that specifies that the encrypted metadata must be encoded with BASE64 URL-safe (this is a variant of BASE64, that uses characters – and _ in stead of + and /). Then it is prefixed with string __cfduid= and transmitted via the Cookie header.

An error will result when this data is processed by tool cs-decrypt-metadata.py without providing the transformation instructions:

The following transformation instructions must be provided to properly decode and decrypt the metadata: 7:Metadata,13,2:__cfduid=,6:Cookie

This is done with option -t:

cs-decrypt-metadata_V0_0_2.zip (https)
MD5: 368EA059E91716DD071975B13A3F108D
SHA256: B906191D376F81E687392EC30EA57483BFC791E3D478E863FA0DB7B468662310

MiTM Cobalt Strike Network Traffic

$
0
0

I made a small PoC. cs-mitm. py is a mitmproxy script that intercepts Cobalt Strike traffic, decrypts it and injects its own commands. In this video, a malicious beacon is terminated by sending it an exit command. I selected a malicious beacon that uses one of the leaked private keys.

The script does not support data transforms, but that can be easily added, for example with code found in cs-parse-traffic.py.

PoC: Cobalt Strike mitm Attack

$
0
0

I did this about 6 months ago, but this blog post didn’t get posted back then. I’m posting it now.

I made a small Proof-of-Concept: cs-mitm.py is a mitmproxy script that intercepts Cobalt Strike traffic, decrypts it and injects its own commands.

In this video, a malicious beacon is terminated by sending it a sleep command followed by an exit command. I just included the sleep command to show that it’s possible to do this for more than one command.

I selected this malicious beacon for this PoC because it uses one of the leaked private keys, enabling the script to decrypt the metadata and obtain the necessary AES and HMAC keys.

The PoC does not support malleable C2 data transforms, but the code to do this can be taken from my other cs-* tools.


Quickpost: Cracking PDF Owner Passwords

$
0
0

I added code to John the Ripper to crack PDF owner passwords (JtR cracks PDF user passwords only).

Source code can be found here.

Compiled Windows (Cygwin) and Linux (Ubuntu) executables can be found here.

This change introduces a new format: $pdfo$.

There is no tool for the moment to create this format. Just use pdf2john.pl to create a $pdf$ hash, and then change it into a $pdfo$ hash. To crack the owner password, one needs to recover the user password first.

This is the illustrated process:

There will be a PR for this change.

Cracking PDF owner passwords is just an academic exercise (writing this code was also just an exercise), as tools like QPDF can decrypt PDFs encrypted with a PDF owner password only without requiring the cleartext PDF owner password as argument.


Quickpost info

Update: xor-kpa.py Version 0.0.6

$
0
0

This is an update for my tool to perform XOR known plaintext attacks: xor-kpa.py.

The tool has been updated for Python 3, and 3 new plaintext have been added, all for Cobalt Strike configurations.

cs-key is the header of the configuration entry for the public key.

cs-key-dot is the header of the configuration entry for the public key XORed with value 0x2E (a dot).

cs-key-i is the header of the configuration entry for the public key XORed with value 0x69 (letter i).

xor-kpa_V0_0_6.zip (http)
MD5: 4BA5EDEAEF6C8D528227607E78A2A797
SHA256: F7BE170D09E8B8A5B4127F64EC66FFF69EFD3EFA3B4EAC0304B39905A75CDE2A

How-to: Make Your Own Cert With Web OpenSSL

$
0
0

I explain how to create certificates with OpenSSL on your Windows computer in my blog post “How-to: Make Your Own Cert With OpenSSL on Windows (Reloaded)“.

If you can’t or don’t want to install OpenSSL, there is a solution now with Web OpenSSL.

With Web OpenSSL, you can just run OpenSSL and the commands in your browser, like this (for more info on these commands , read my blog post).

Go to Web OpenSSL:

Scroll down a bit:

Click “Enter split screen”. You will now have a command-line interface to the left and the folder with files to the right:

Enter this command:

openssl genrsa -out ca.key 4096

Notice that 2 files have been created. You can take a look at them, for example ca.key:

Enter this command and answer the questions:

openssl req -new -x509 -days 1826 -key ca.key -out ca.crt

Enter this command:

openssl genrsa -out ia.key 4096

Enter this command and answer the questions:

openssl req -new -key ia.key -out ia.csr

Create a text file named altname.cnf and enter your domain name, this is the content for my domain name: subjectAltName=DNS:www.didierstevens.com

Upload this file (button Browse in Files) and check it was properly uploaded:

Enter this command:

openssl x509 -req -days 730 -in ia.csr -CA ca.crt -CAkey ca.key -set_serial 01 -out ia.crt -extfile altname.cnf

Enter this command:

openssl pkcs12 -export -out ia.p12 -inkey ia.key -in ia.crt -chain -CAfile ca.crt

You can then download all your files:

Verify and start using them:

If you want to understand what these commands exactly do, read my blog post “How-to: Make Your Own Cert With OpenSSL on Windows (Reloaded)“.

Viewing all 78 articles
Browse latest View live